


Working with Debts
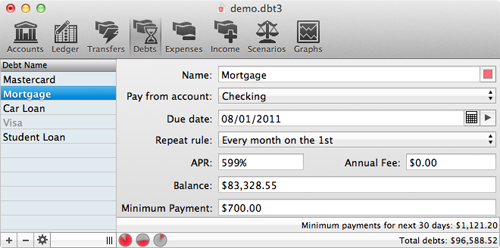
To get up and going quickly with adding debts, refer Quickstart Guide. Or read on here for more advanced options.

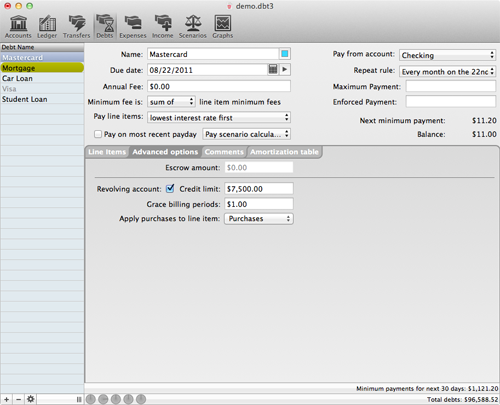
Working with the Complex View
Sometimes debts just aren't simple enough for the default view. They have multiple line items and variable interest rates and are, well, complex.
- Go to the Debts Pane
- To switch to the complex view, select the debt you want to edit, or add a new one. Then click the gear button in the lower left. In the pop up, choose
"Switch to complex view". If you decide you prefer working in the complex view you can set an option here to stay in it.
Likewise, if you want to go back, just select a debt in the complex view and then use the gear to switch back. Be warned - debts that are actually complex cannot be viewed in the simple view.
- The complex view contains all of the options of the simple view, plus several additional ones. The first one is on the top right, 3rd
field down - "Maximum Payment". You can use this to throttle how much money is sent to your debt. Say you only want to send $100 extra to it, no matter what the scenario
tells you. You can specify that here. This is useful for things like mortgages, which you may not care about paying off early no matter what due to tax savings from interest.
BUT REMEMBER you do not need to set a maximum payment. Some people think it's required to keep a scenario from running out of money, and it has no impact on it. Setting a maximum payment is guaranteed to cost you more money in the long run, and will also not stop out of money errors. So only set it if you really have a valid reason to. If you're not sure, then just leave it alone.
- Immediately below that is the enforced payment. Complex debts typically calculate their minimum payments through their line items, but sometimes you need to have the debt itself enforce a minimum. For example, you may have 2 line items and each of them say the minimum fee should be 2% of their balance. But no matter what, you are required to send at least $25 to the debt itself. Fill that value in here.
- Speaking of minimum fees, specify in the popup box how to calculate the minimum fee - it can be either the sum, the smallest, or the greatest of the minimum fees of the individual line items.
- Next, you can specify the order in which line items are paid off. 99 times out of 100, it is required by your bank to be lowest interest rate first. So if your credit card has a rate of 14% and you do a balance transfer on of some amount at 0%, that entire balance transfer will be paid off first before your purchases at 14% are taken care of. Nothing we can do about it, so just make sure it's set the way your bank requires.
- Next, you'll need to fill in line items.
- Each line item is a distinct balance on your debt. Usually, these will only apply to credit cards where you can have a balance transfer. So part of your debt is at 0%, part is at 7%, and part is at 15%, or however it's structured. Most other debts (car loans, mortgages, and so on) have a single line item.
- Next, for each line item, specify its interest rates and minimum fees. Each line item can have more than one of each, but only one can be active at a time. This is where you'll specify that your balance transfer line item has a 0% rate for the next 6 months, but that 15% rate kicks in again in June.
- The interest rate can be either an APR or a flat fee, or some combination of the two.
- The minimum fee can be either a percentage of the balance, or a flat fee, or some combination of the two.
- Additionally, you can check a box to include the interest accrued. This does not factor into the combination of balance percentage and flat fee.
For example, you can set your card to have a minimum payment of the interest accrued, plus either 2% of the balance or $25, whichever is greater.
Working with the Advanced Options
- The next tab at the top of the complex view allows you to specify advanced options on a debt.
- First of all, if this a mortgage and you escrow your taxes, you can fill in that amount here. The escrow amount will be subtracted off of your payment. SO if you're sending $800, but $200 is escrowed, then only $600 is going towards your debt. Be sure to fill in the appropriate numbers!
- Next, if this is a credit card, check off that it's a revolving account and fill in the credit limit. This has several advantages -
First, it lets you use this debt to pay expenses.
And second, it will now show up on the ledger screen to allow you to record purchases against it directly.
- Next, specify the number of grace billing periods you have on purchases. Normally, credit cards won't accrue interest for the first month if you don't have an outstanding balance.
- Finally, let it know which line item your purchases are placed on. If you have multiple line items, this won't be any of your balance transfers.
- Last thing is that you can specify arbitrary comments on the debt to help you keep track of it.


