Working with the Ledger
Debtinator mainly concentrates on the future, but it also helps you deal with the past. To do that, you can work with the Ledger pane. Here you can record transactions, view graphs and reports, and keep track of the scenario you'd saved as your payment plan.
This is also where you can virtually segment your bank accounts into budgets.
The Envelope System is a a budgeting system that your grandparents probably used. Basically, you budgeted your money by putting it into separate envelopes. So you had your envelope for rent, your envelope for food, your envelope for entertainment, and so on. It's a very good system since it keeps you honest and keenly aware of your money. You can see at any given time how much money you have available for whatever activity you're trying to do. And you also know that if you're short you're taking the money away from something else. Really want to eat out tonight but have no money in the entertainment budget? Then it's coming out of food and you'll have less money for groceries.
This way, your money isn't in a gigantic pot. When it's all mixed together, it's easy to think that you can spend just a little more since you're sure you can make it up somewhere. This requires you to make it up immediately and know exactly how.
But there's a problem with the envelope method - it's antiquated. You probably don't deal with cash very much, and when you do it's in small amounts. You can't pay your bills in cash, you can't pay a lot of your expenses in cash. You probably use your debit card. So what Debtinator does is allow you to segment your bank account virtually into budgets. So you have your envelopes and know where your money is allocated, but you also get to keep it in the bank and mainly use your debit card. Best of both worlds.

Using the Ledger
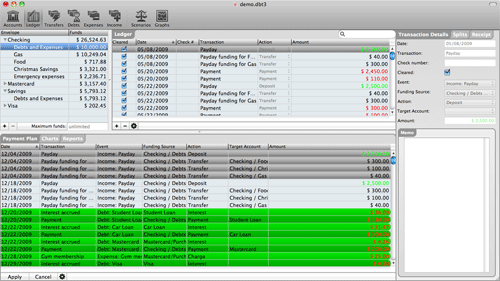
- In the upper left of the Ledger window you can select which account you want to work with. Hit the disclosure triangle next to an account name to expand it. All accounts must have at least one budget in them - "Debts and Expenses", which is the budget used by Debtinator when running scenarios. Any other budgets you create are for your own personal use.
- To create a budget, just select the appropriate account and click the "+" button underneath the table and fill in the budget's information. Optionally, you
can also specify a maximum amount for the budget. Debtinator won't let you deposit more than that amount in there.
This is useful for planning purposes. Say you want to set aside $100 every week for food. If you don't have a maximum cap on the budget, then every week Debtinator will try and move $100 into that budget. But if you only spend $70 one week, it'll still move in $100 the next week and you'll have $130 available. That may be fine, and it may be what you want to do.
Or you may want a "use it or lose it" approach - you can spend up to $100, but if you don't, then it just spills over to next week. In that case, set the maximum funds to $100. Then Debtinator will only move over $70 the next time it's funded.
You can also save until you reach a goal. Once the scenario reaches the goal you provided, no longer continue to fund it.
So what's the difference?
- "Maximum funding" is good for something like your Groceries budget. You always want to have $100/week in you Groceries budget, but you don't necessarily spend that $100. The scenario will assume that you've spent all $100 every week, so it will always replace it for you. But, if in a given week you only spend $80 on Groceries. You still have $20 left in there. So when you apply the funding from your saved payment plan, it'll automatically reduce the funding for you and only move $80 into Groceries, leaving the rest available in Debts and Expenses to put towards your debt instead.
- "Save until goal" is good for something like trying to buy a new computer. You're going to set aside $25 per paycheck for the next year until you have $1,000. Set that as your savings goal. Debtinator will keep moving money into it until you've reached your $1,000 goal, but then it'll stop funding it and instead leave that $25 for your debts.
- Once you've selected the budget you want to work with, you can log a transaction against it. Transactions go into the Ledger table and are the record of what you've done
with your money. Just hit the "+" button under the Ledger table to add a transaction. Several pieces of information must be filled in.
- Cleared is a checkbox so you can note if a transaction has cleared the bank or not. Transactions that are transfers between bank accounts have 2 on states, so you can review it on both sides.
- Date is the date the transaction occurred
- Check # is the check number (if applicable)
- Transaction is the payee. The supermarket, the gas station, the cable bill, or whatever.
- Action is the type of event that's occurred. Several actions are available, depending upon whether it's a transaction on a bank account or a credit card.
- Bank account
- Deposit - put money into this budget
- Withdrawal - take money out
- Transfer - move money to a different budget
- Payment - pay money to a debt
- Credit card
- Interest - interest charged to this debt
- payment - a payment made by this debt to another debt. This is how you would record a debt-to-debt balance transfer
- charge - a charge accrued
- transfer - transfer money from your card to your bank account
- And finally, the amount of the transaction.
- Further options may need to be filled in on the Transaction Details tab on the right.
- You can specify an event that created this transaction - this helps you match up your transactions with events specified on the other panes.
- The funding source is the budget you've added this transaction to. If you made a mistake, you can move it somewhere else here. You can also drag and drop the transaction onto a different budget to move it.
- The target account is the recipient of the transfer or payment.
- Finally, you can add a memo to remind you of the transaction
- You can search for specific transactions by typing into the search box in the upper right.
- Or you can filter out cleared transactions by clicking the gear button in the lower left.
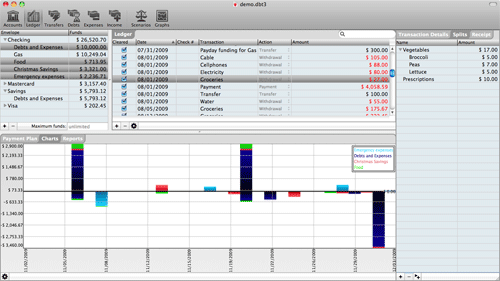
- Transactions can also have splits (covered in the next section), or you can drag in a receipt to store it with your file.
Please note that Debtinator will only ever withdraw money from your Debts and Expenses envelope when running a scenario. You cannot move money out of any other budget. This functionality will be added in a future release.

Split transactions
You can record your transactions with as much granularity as you'd like. Sure, it's nice to know that you spent $100 at the grocery store, but it could also be useful to know what you spent it on. That's where split records come in. You can segment your transaction as many ways as you want to drill down to as fine a level of granularity as you feel is important.
- Click on the Splits tab in the upper right.
- Use the "+" and ">+" buttons to add either split records, or sub split records.
- Fill in their name and dollar amounts.
- Repeat as desired

Using a payment plan
Once you've created a scenario you like on the Scenarios pane, you can save it as a payment plan and it will show up here. That way, as events come due, you only need to hit the Apply button to record them in your Transaction Ledger. It gives you a single point to keep track of what's coming up and what you've already done.
- To apply transcations, simply highlight the ones that have already occurred and click the "Apply" button. If Debtinator is unable to apply them, it will warn you.
- If any changes need to be made to a transaction before applying it, simply edit it first, and then apply.
Please note that related transactions must be applied simultaneously. So you can't fund a budget without simultaneously applying the income event that it came from. This is by design.
- If you don't need to apply a payment for some reason, then select it and click cancel to delete it.
Sometimes the payment plan will get out of sync with reality. If you've recorded additional transactions against the Debts and Expenses budget that Debtinator wasn't expecting, the payment plan will begin to fail. If that happens, Debtinator will present a warning that the plan is out of date and ask you to regenerate it. You can see the specific problems it has by clicking the gear button in the lower left and choosing to view upcoming items that are short. If Debtinator is complaining that your plan is invalid, it's important to generate a new payment plan as quickly as possible to ensure you don't run out of money following an out of date plan. Transactions that you cannot currently pay will show up highlighted in red.
There is additional color coding for other things as well.
- payment plan transactions that are highlighted in yellow are past due! Take care of these immediately to make sure you don't get any late fees
- Payment plan transactions that are highlighted in green can be payable now with no negative repurcussions. So if you really want to pay that bill now instead of waiting, you can feel free.

Charts
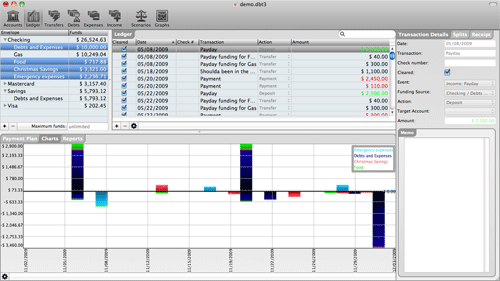
Debtinator will chart out your cash flow for you, for the selected budgets. Just highlight the budgets you're interested in, and choose the Charts tab to view the cash flow. You can filter the date ranges displayed by clicking the gear button down below.
Have an idea for an additional chart you'd like to see? Please email it to us! We're always looking for more data to present to our users, we just need to know what you want to see.

Reports
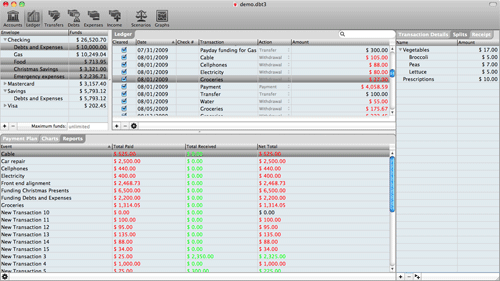
Debtinator will also give you a spending summary of where your money has been coming from and going to. Just highlight the budgets your'e interested in, and choose the Reports tab to view the summaries. You can filter the date ranges displayed by clicking the gear button down below.
Have an idea for an additional report you'd like to see? Please email it to us! We're always looking for more data to present to our users, we just need to know what you want to see.
- Ledger questions
- Debtinator says my payment plan is invalid! What gives?
-
You deviated from the plan. After you filled in your income, expenses, and debts, Debtinator used all of that information to generate a payment schedule for you to pay off your debts as quickly as possible. But it also assumes that you're going to follow it exactly. This is important! Debtinator will tend to drain your bank account to $0 to send as much money to debts as fast as possible, and that's okay. But only as long as you follow the plan.
What if it's planning on sending a $500 overpayment to your credit card next month to drop your bank account to $0, and you take out an extra $25 to go to the movies? If you follow the plan, you may try sending $500 to the card and then realize you can't pay your rent next week. Debtinator was counting on that $25 being there.
But it's okay. Things happen. Life intervenes, and changes from the plan happen. But when they do, Debtinator will warn you about it so you can go re-generate your payment plan and it'll know to only overpay $475 to your credit card to keep you going.
- Why did a "manual adjustment" transaction show up in my ledger?
- If you directly edit your bank account balance on the Accounts pane, then the system will automatically log a transaction for your manual adjustment of your account balance.
- When I try to clear a transaction, the button turns into a little minus sign and it still shows up all the time! What gives?
-
You just need to click it twice to turn it into a checkmark and flag it as cleared. Then it will be filtered. If the minus symbol shows up, it is considered
uncleared.
This is to help with double entry transactions - say you transferred money from your checking account to your savings account and are reconciling your ledger with your bank account balance. You can click it to a minus on the Checking ledger to indicate that you've seen it there, and then when you view the transaction on the savings side, you'll see that it's already been cleared in the other account, so you can click it again to clear it entirely.


